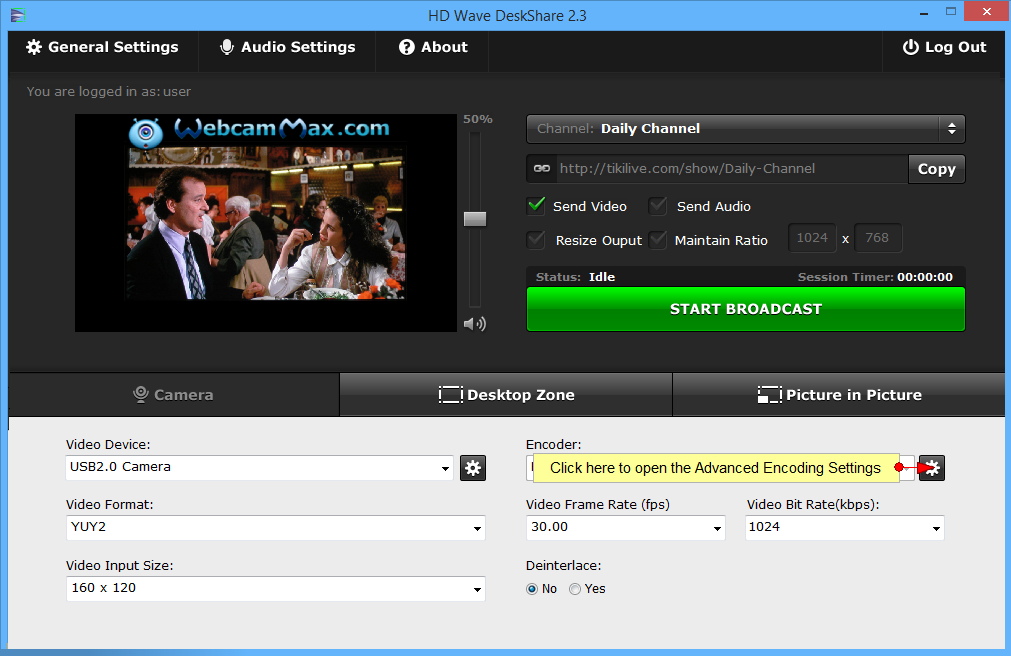
To access the advanced encoder settings, click the tools icon:
Important: please do not change the values without first consulting this guide.
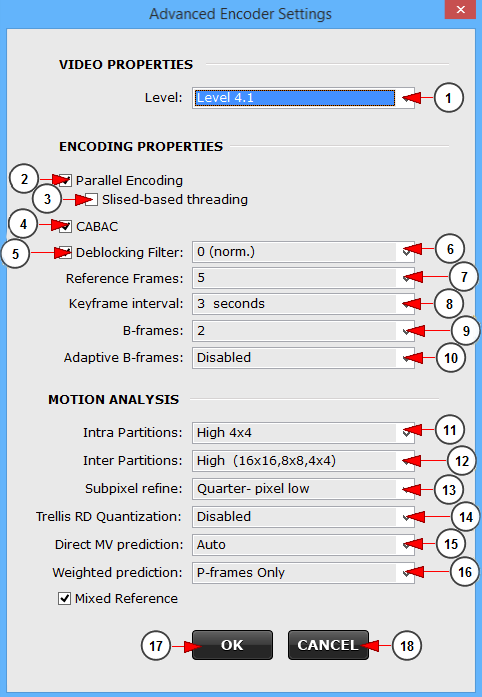
A pop up window will be displayed and you can adjust the encoding settings:
1. Click here and select from the drop-down the level of encoding process to the video stream. For best HD streaming we recommend you to set the encoding level to 5 or 5.1.
2. Check this box to turn on Parallel Encoding which divides the frames of a video into smaller pieces, then encodes them in multiple, parallel threads.
3. Check this box to enable sliced-based threading. This threading method is recommended for live streaming as it adds no encoding latency.
4. Check this box in order to use CABAC and have better results using H.264 compression.
Here you can view the definition of CABAC and here you can view the definition of H.264.
5. Check this box to enable the deblocking filter.
6 From this drop-down menu you can adjust the deblocking filter on your video stream. With a lower value you will get a faster start to the video stream on your channel page but will result in more blocking artifacts in the stream. With a higher value the stream start will be delayed on the channel page but the stream will have less blocking artifacts.
Here you can view the deblock definition.
7. From this drop-down menu you can select the reference frames. A lower value will cause a fast start of the video stream on your channel page but it will have lower quality; with a higher value the stream start will be delayed on the channel page but the stream will have better quality.
Here you can view the reference frames definition.
8. From this drop-down menu you can select the keyframe interval. A lower value (24 to 240) will cause a fast start of the video stream on your channel page but it will have lower quality; with a higher value ( > 960 ) the stream start will be delayed on the channel page but the stream will have better quality.
Here you can view the keyframe definition. Keyframes are pictures coded without reference to any pictures except themselves.
9. From this drop-down menu you can select to use B-frames on your video stream. With a lower value you will get a high bandwidth stream; with a higher value you will get a low bandwidth stream.
Here you can view the B-frames definition.
10. From this drop down you can enable or disable the adaptive B-frames.
11. From this drop-down menu you can select an intra partitions quality for your video stream. If you select a higher value you will get a better quality stream but more resources of your computer will be used.
Here you can view the intra partition definition.
12. From this drop-down menu you can select an inter partition quality for your video stream. If you select a higher value you will get a better quality stream but more resources of your computer will be used.
Here you can view the inter partition definition.
13. From this drop-down menu you can refine the subpixel motion for your video stream. If you select a higher value you will get a better stream quality but more resources of your computer will be used.
Here you can view the subpixel motion definition.
14. From this drop-down you can enable or disable the Trellis RD quantization.
15. From this drop-down you can set the direct MV (motion vector) prediction as auto, spacial or temporal.
Here you can read more details about the motion prediction vector.
16. From this drop-down you can enable or disable the weighted prediction. An adaptive weighted prediction algorithm is proposed to improve the coding efficiency for video scenes that contain global brightness variations caused by fade in/out or local brightness variations caused by camera flashes.
17. Check this box to enable mixed reference.
18. Click here to save your settings.
19. Click here to cancel.


