Important: in order to broadcast on a radio channel using Winamp DJ you need to install Winamp application (http://www.winamp.com/) and Shoutcast plugin (http://download.nullsoft.com/shoutcast/tools/shoutcast-dsp-2-3-3-windows.exe).
Winamp DJ application offers you the possibility to broadcast your playlist and also to stream your microphone.
Once the application is installed in your computer, you need to configure its broadcast settings.
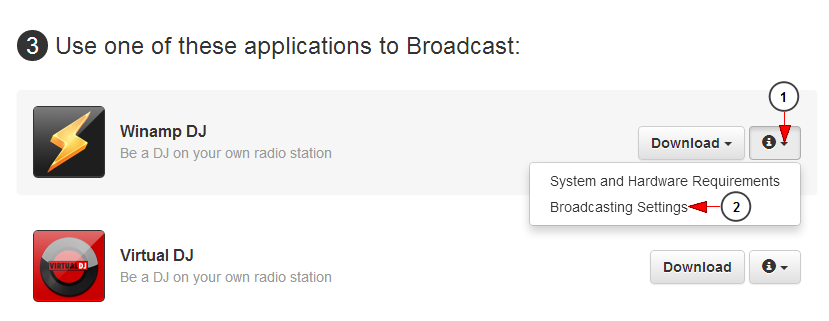
The first thing you need to do is to view the broadcast settings for Winamp from your account dashboard:
1. Click here to open the drop-down menu.
2. Click here to view the broadcast settings for Winamp DJ.
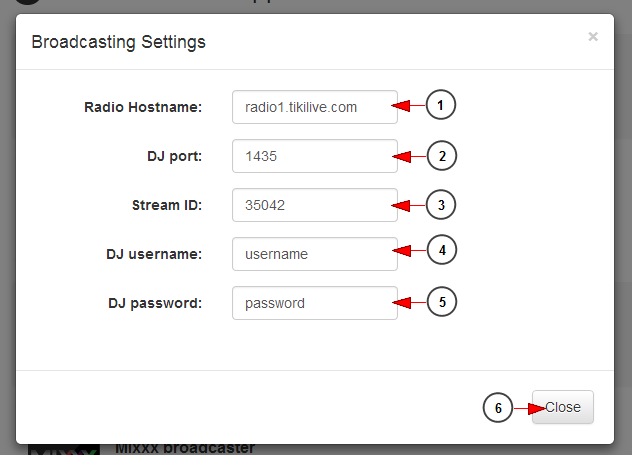
An overlay window will be displayed and you can view the settings you need when configuring Winamp application in your computer:
1. Here you can see the radio host-name.
2. Here you can see the DJ port number.
3. Here you can see the stream ID.
4. Here you can see the DJ username.
5. Here you can see the DJ password.
Note: the DJ credentials are the ones you insert when you create a new radio channel. The username and password can contain only lower case letters, numbers and dashes (a-z/A-Z/0-9 -).
6. Click here to close the overlay window.
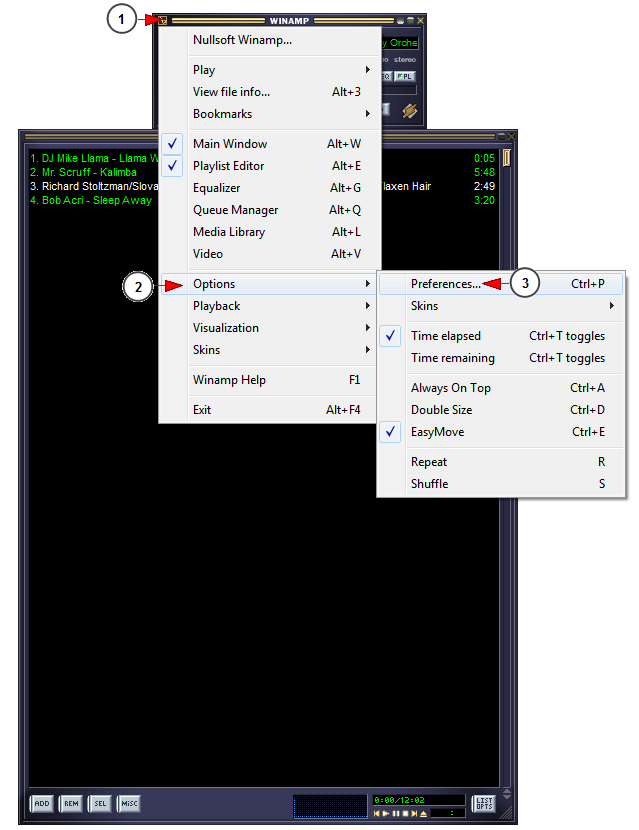
Open Winamp and click CTRL and P on your keyboard to adjust the preferences.
You can also open the Winamp menu as you can see in the following picture:
1. Click here to open Winamp menu.
2. Click on the Options link, to open the menu.
3. Click on Preferences link to edit the broadcast preferences.
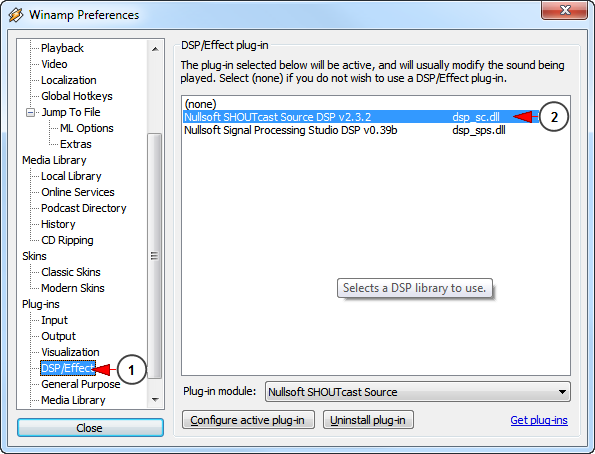
A new pop-up window will open:
1. Click on the DSP/Effect link from the left side menu.
2. Click on Nullsoft SHOUTcast Source DSP v2.3.2 link to configure radio broadcast settings.
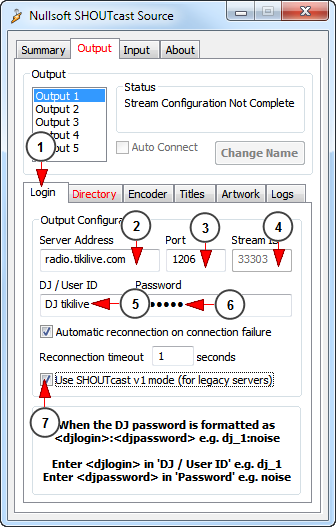
A new pop-up window will open and you need to insert the login details from Streaming platform platform:
1. Click here to manage the login settings.
2. Insert here the server address.
3. Insert here the port number.
4. Insert here the stream ID.
5. Insert here the DJ username.
6. Insert here the DJ password.
7. Check this box to use Shoutcast plugin for radio broadcast.
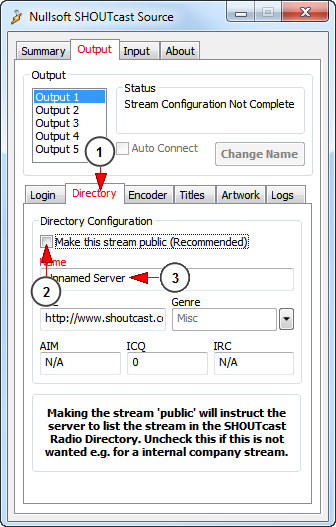
The next step is to adjust the Directory settings:
1. Click here to view Directory settings.
2. Check this box if you want to make your stream public on Shoutcast server.
3. Insert here a name for the radio directory on Shoutcast server.
Note: it is mandatory to insert a directory name even if you make the stream public or not, otherwise the stream configuration will not be complete.
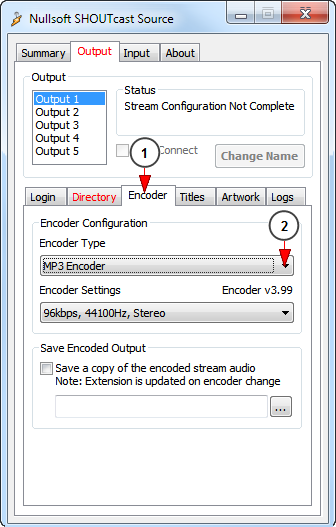
The next step is to adjust the Encoder settings:
1. Click here to view the Encoder settings.
2. Select from the drop-down menu MP3 encoder type.
Once these settings are done, the song you listen in Winamp will start playing on your radio channel.
Note: when streaming with Winamp the song cover will not be displayed on the radio channel page, (the radio thumbnail is displayed) only the song title and artist will be displayed.
Stream your microphone
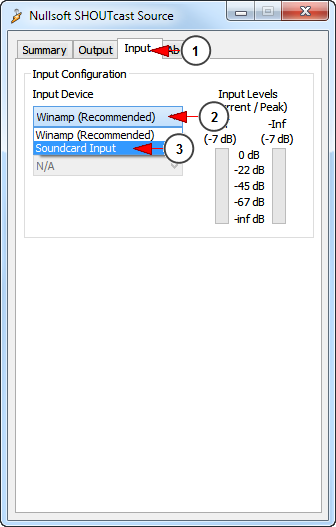
You can talk live on your radio channel using Winamp DJ. All you need to do is set up your input device microphone:
1. Click here to view the Input settings.
2. Click here to open the drop-down menu.
3. Select the Soundcard Input option.
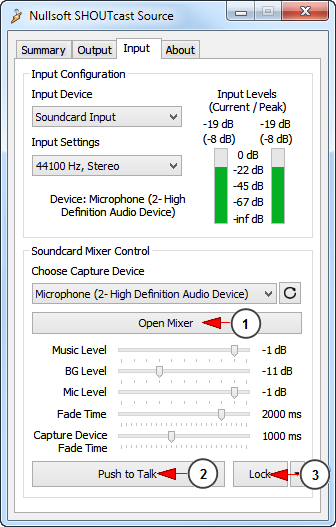
Once the Soundcard Mixer Control options are displayed you can start using your microphone and broadcast live on your radio channel:
1. Click here to open the Mixer settings and adjust them as you prefer.
2. Click here to turn on your microphone.
Note: you need to keep the button pressed while talking.
3. Click here to lock the Push to Talk button.
Note: the lock button will turn on your microphone. When you finish talking press the button again and your microphone will be turned off. Your radio channel will continue playing the tracks on your playlist..


