Broadcasters like having options. For this reason we have made it easy to use popular 3rd party broadcasters with your Streaming platform channel or network. Maybe you’ve switched from another platform and you’re comfortable with a different broadcaster or you like the specific features that another broadcaster offer. Whatever the case, you have options with Streaming platform.
Important: 3rd party broadcasters may work, but they are not supported. All time to troubleshoot live streams from a 3rd party broadcaster is considered exploratory. We highly recommend you to use our supported broadcasters: HD Wave, SD Wave or Streaming platform Web broadcaster.
Broadcasters compatible with Streaming platform include:
1. Flash Media Live Encoder – www.adobe.com
Adobe Flash Media Live Encoder 3.2 live audio and video capture software is a media encoder that streams audio and video in real time to Flash Media Server software or Flash Video Streaming Service (FVSS). When high-quality streaming is your priority, Flash Media Live Encoder 3.2 can help you broadcast live events and around-the-clock broadcasting. Available for both PCs and MACs this is great tool to get steady broadcasts.
2. Wirecast – www.telestream.net
Plug-in your cameras. Prepare your shots. Broadcast live. Wirecast software lets you produce professional-looking live events with just a camera, an internet connection and a computer. Stream or record live internet shows, broadcast breaking news or sporting events, stream live concerts, transmit church services, corporate meetings, lectures and much more.
Note: From our tests we have concluded that Wirecast is NOT compatible with auto-record, and causes audio/video synchronization issues.
3. TriCaster – www.NewTek.com
The process of creating live, network-style productions can be very costly and require massive amounts of expensive equipment and a large crew of people. TriCaster™ changes all of that, starting with pricing at $4,995 for education. In one lightweight, portable system (small enough to fit in a backpack), you have all of the tools, including live virtual sets (using proprietary NewTek LiveSet™ technology), required to broadcast, live stream, project, and record your show.
Note: Additionally you may use for streaming the RTMP link in the following form:
rtmp://fms.NKTelko.com:1935/show/123456/streamname
Where 123456 is the ID of the channel and streamname is the name of the stream
4. VidBlaster – www.VidBlaster.com
VidBlaster is a state-of-the-art live video production tool that allows you to easily broadcast or record live events up to HD quality. It is an affordable multi-camera real-time software solution that is very easy to use. Whether you want to record a simple home video or do a live HD television broadcast, VidBlaster is the number one solution! Use VidBlaster to broadcast, stream and/or record live camera feeds together with pre-recorded video, audio and graphics. Enhance your video production by including transitions, overlays and video effects.
5. XSplit – www.xsplit.com
XSplit Broadcaster is a popular Windows application to create professional multimedia broadcasts and recordings. The software enables you to spend more time producing content and less time in post-edit with its easy and convenient features. You can produce high level video broadcasts, conferences, distance-learning courses, campus newscasts, game broadcasts – anything you want!
6. vMix – http://www.vmixhd.com
vMix is a Software Video Mixer and Switcher that utilises the latest advances in computer hardware to provide live HD video mixing, a task previously only possible on expensive dedicated hardware mixers.
vMix is a complete live video production software solution with features including LIVE mixing, switching and streaming of SD and HD (up to 1080p) video sources including cameras, video files, DVDs, images and much much more.
Visit our features page for a complete listing of what is possible.
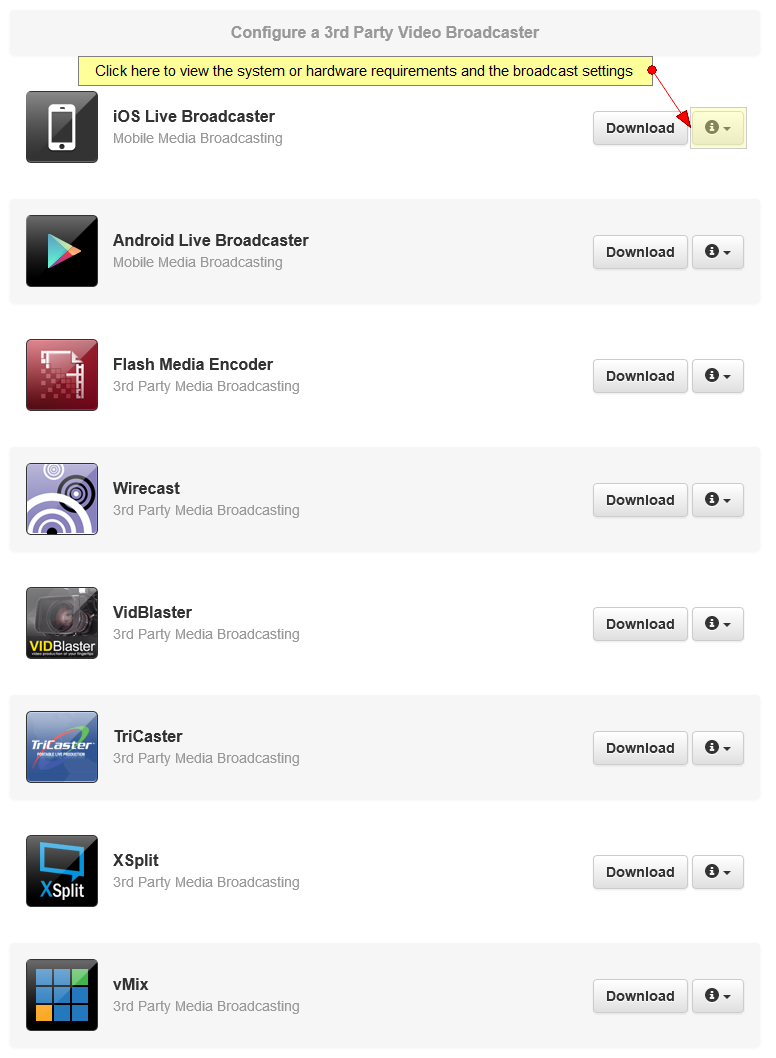
In order to broadcast using one of the Broadcast applications mentioned above, you need to configure the RTMP server settings.
In order to view the 3rd party broadcasters details or the broadcasting settings, click on the “i” button in line with the broadcaster you want to use:
Then a menu will appear and you will have to select “Broadcasting settings“:
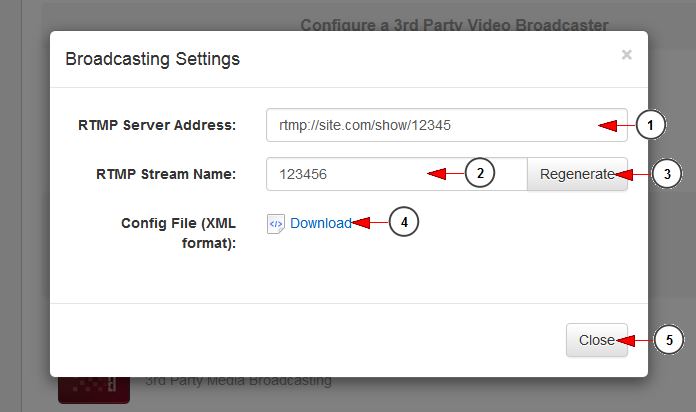
An overlay window will appear and you can view the RTMP Server Address and RTMP Stream Name:
1. Here you can see the RTMP server address, that you need to copy and insert the selected 3rd party broadcaster.
2. Here you can see the RTMP server name, that you need to copy and insert the selected 3rd party broadcaster.
3. Click here to generate a new RTMP stream name.
4. Click here to download the configuration file in your computer.
5. Click here to close the broadcasting settings overlay window.
In this chapter we described how to install and run the following broadcasters:


