Logged in as a user, click on Sold Tickets link from under My Sales menu to view a complete report on the WordPress products you have sold on your website:
Once the page opens you can use the filters and select the desired time period to view the report of sold WordPress products:
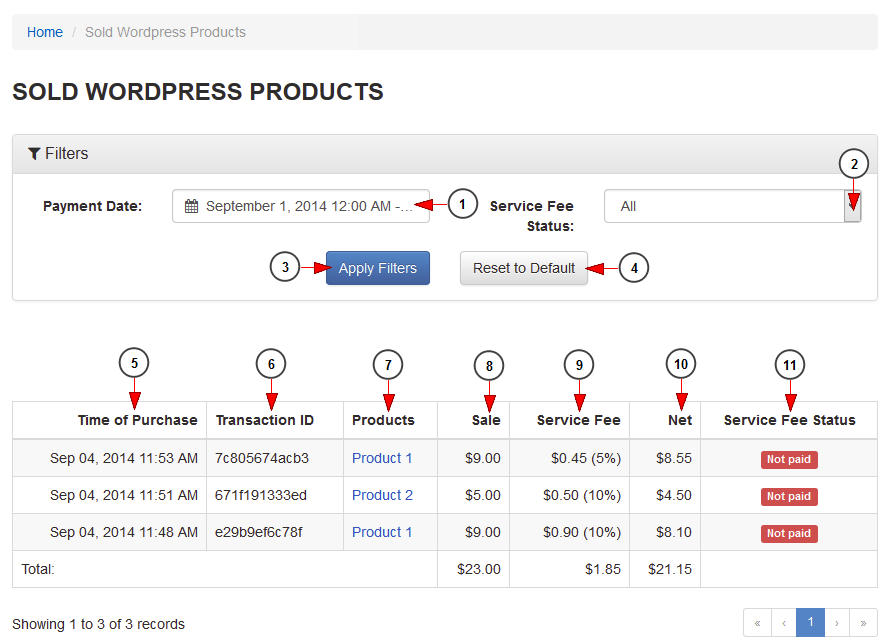
1. Click here to open the calendar and select the desired period of time.
2. Select from the drop-down menu to filter the report according to the service fee status: paid or not paid.
3. Click here to apply the selected filters.
4. Click here to reset the filters to default.
5. Here you can see the product time of purchase.
6. Here you can see the transaction ID.
7. Here you can see the Product name. Click on it and you will be redirected to WordPress product page.
8. Here you can see the product sale price.
9. Here you can see the product service fee.
10. Here you can see the product net income.
11. Here you can see the product service fee status.
Time filter calendar

1. Click here to select the current day to view the bandwidth usage graph.
2. Click here to select the previous day to view the bandwidth usage graph.
3. Click here to select the current week to view the bandwidth usage graph.
4. Click here to select the current month to view the bandwidth usage graph.
5. Click here to select the current year to view the bandwidth usage graph.
6. Click here to select a custom range to view the bandwidth usage graph. The 2 calendars will be displayed like in the picture above.
7. Click here to select a start date for the date range filter.
8. Click here to select an end date for the date range filter.
9. Click here to apply the selected dates.
10. Click here to cancel selecting a custom range period.
11. Select from the drop-down menus the desired month and year for the start date.
12. Select from the drop-down menus the desired month and year for the end date.
13. Click on the desired day of the calendar to select the start date.
14. Click on the desired day of the calendar to select the end date.
15. Select from the drop-down menus the exact hour and time for the start date.
16. Select from the drop-down menus the exact hour and time for the end date.